
ICS3U: Introduction to Computer Science, Grade 11, University Preparation
Unit 2: Introduction to Programming
Activity 4: Selection Control Structure
Learning Goal: By the end of this activity, I will be able to create simple programs using the selection (if, switch) control structure.
Content
You make decisions every day. Will you have toast for breakfast today or will you have eggs? Will you take an umbrella with you today because it is raining or will you leave your umbrella at home? Decisions allow you to take a certain action based on some condition. For example, the condition could be, "is it Saturday morning?" If it is Saturday morning, then you will sleep in, but if it is not Saturday morning then you will get up early.
Computers can also be programmed to make decisions. These decisions allow the program to take certain actions based on certain conditions. This makes the program more functional and more flexible.
Selection Control Structure
In the first three activities, you have become familiar with the sequential control structure, where one statement after another in a computer program is executed in order. In this activity, you will use several selection control structures that allow the computer program to execute the statements in a different order.
You can use a selection control structure when you want the computer to choose between alternative actions. You make a conditional statement that is either true or false. If the conditional statement is true, the computer executes another statement or set of statements. If it is false, it executes a different statement or set of statements. The computer's ability to solve practical problems is an outcome of its ability to make decisions and execute different statements.
Boolean Expressions
In programming languages, a condition takes the form of a Boolean expression (sometimes called a logical expression). Every Boolean expression has one of the two Boolean values: true or false.
Boolean expressions can be created in the following ways:
- boolean variables (can be assigned a value of true or false)
- comparison (or relational) operators
- boolean operators (next unit)
Comparison Operators
Comparison (or relational) operators test a relationship between two values and determine if the relationship is true or false.
| Operator | Relationship Tested |
|---|---|
| == | Equal to |
| != | Not equal to |
| < | Less than |
| > | Greater than |
| <= | Less than or equal to |
| >= | Greater than or equal to |
If Statement
The if statement is the fundamental selection control structure that allows the computer program to select certain statement(s) to execute. With it, you can test a relationship and choose a course of action.
The if statement comes in two forms, the if form and the if-else form.
If form |
If-Else form |
|---|---|
| Sometimes you run into a situation where you want to say, “If a certain condition is true, perform some action; otherwise, don't do anything.” The If form of the If statement would be used in this case. | Sometimes you run into a situation where you want to say, “If a certain condition is true, perform one action; else perform a different action.” The computer performs just one of the two actions under any given set of circumstances. The If-Else form of the If statement would be used in this case. |
The syntax of an if statement is:
if ( <condition> ) {
    <statements>
}
|
The syntax of an if-else statement is:
if ( <condition> ) {
    <statements #1>
} else {
    <statements #2>
}
|
| The |
The |
Example:
if (temperature > 0) {
    Console.print("Above freezing");
}
|
Example:
if (age < 18) {
    Console.print("Too young to vote.");
} else {
    Console.print("Old enough to vote!");
}
|
 |
|
|---|
 Check Your Understanding
-
Which output statement will be displayed in the Console?
boolean socksOn = false;

if (socksOn) {
    Console.print("Put shoes on.");
} else {
    Console.print("Put socks on.");
}
Answer
-
Which output statement will be displayed in the Console?
int numStudents = 30;

if (numStudents > 25) {
     Console.print("The number of students is greater than 25.");
} else {
     Console.print("The number of students is less than or equal to 25.");
}
Answer
The Else-If Statement
Suppose you wanted to choose from a set of alternatives and not from just two alternatives. An else-if statement could handle the choices.
The syntax of an else-if statement is:
if ( <condition #1> ) {
    <statements #1>
} else if ( <condition #2> ) {
    <statements #2>
} else {
    <statements #3>
}
Each condition must produce a Boolean result. The FIRST condition to evaluate to true will cause its block of code to execute. If none of the conditions evaluate to true, the code in the else block is execute.
Example:
if (guess == SECRET_NUM) {		//correct
    Console.print("You guessed it!");
} else if (guess < SECRET_NUM) {	//too low
    Console.print("Too low.");
} else {				//too high
    Console.print("Too high.");
}
Note that if a condition is true then only the statements with that condition are executed. None of the other conditions are tested or executed. This is important to keep in mind while choosing the order in which to create your condition statements! The order of your expressions is important because it can affect what statements are executed.
Check Your Understanding
-
Suppose you wanted to write a selection structure to assign a student a level based on their percentage. Can you spot the problem with the following block of code? How could you rewrite it so it will work properly?
if (mark > 50) {
    grade = "Level 1";
} else if (mark > 60) {
    grade = "Level 2";
} else if (mark > 70) {
    grade = "Level 3";
} else if (mark > 80) {
    grade = "Level 4";
} else {
    grade = "Below Level 1";
}
Answer
-
Which output statement will be displayed in the Console?
double bankBalance = 50;

if (bankBalance > 100) {
     Console.print("There is more than $100.00 in this bank account.");
} else if (bankBalance > 0) {
     Console.print("There is $100.00 or less in this bank account.");
} else {
     Console.print("There are no funds available in this account");
}
Answer
Nested If Statements
A nested if statement refers to an if statement inside another one. Take a look at the following example
if (gradeLevel == 10) {
    if (homeroom == 100) {
        Console.print("You are in Homeroom 100.");
    } else {
        Console.print("Your Homeroom is not listed in Grade 10.");
    }
}
The only way the homeroom == 100 condition is evaluated is if gradeLevel is equal to 10, otherwise it is completely skipped. If gradeLevel is equal to 10, then the program will evaluate the code inside this statement.
The Switch Statement
The switch statement is a conditional control structure that uses the result of an expression to determine which statement to execute. The switch statement is sometimes preferable to the else-if statement because code may be easier to read.
The syntax of a switch statement is:
switch (<expression>) {
    case x:
        <statements>		//these statements will run when expression equals x
        break;
    case y:
        <statements>		//these statements will run when expression equals y
        break;
    ...				//may be multiple clauses
    default:			//optional, executed when none of the cases are met
        <statements>
        break;
}
The expression must evaluate to either an int or char data type (not double). If you are using JDK 7 or later, you can also use a String expression for the switch statement.
Here is an example of a switch statement:
switch (standing) {
    case 1:
        Console.print("Gold Medal");
        break;
    case 2:
        Console.print("Silver Medal");
        break;
    case 3:
        Console.print("Bronze Medal");
        break;
    default:
        Console.print("Certificate of Participation");
        break;
}
It is good practice to include a default case that will execute if none of the case statements match the expression. Each case statement should end with a break statement which prevents a fall-through error. When a case falls through, it executes the code in the next case statement. This can be useful when the same set of statements applies to more than one situation.
Check Your Understanding
-
Can you tell which output statement will be displayed in the console when score contains the value 3? What about a score of 6?
switch (score) {
    case 0:
        Console.print("Better luck next time.");
        break;
    case 1:
    case 2:
    case 3:
    case 4:
    case 5:
        Console.print("Pretty good.");
        break;
    case 6:
    case 7:
    case 8:
    case 9:
    case 10:
        Console.print("Good!");
        break;
    default:
        Console.print("Out of range");
        break;
}
Answer
Introducing the Debug Perspective
Debugging is the process of getting an application to work correctly (removing program 'bugs' - bits of code that do not work as intended.) Many IDEs contain tools that help the debugging process.
A very simple way to debug code is to add additional Console.print() statements to an application to help detect logic errors. You can place these statements just after a variable is assigned a new value, or before and after a condition to help detect a logic error.
Another simple option is to comment out code to narrow down which part of the program is causing an issue. You can select a block of code and select Source -> Toggle Comment (or Ctrl+/) to block out a large section of code all at once. Perform to same action again to un-comment (but make sure you have selected the same block of code!)
Eclipse offers a perspective that is helpful for finding logical errors, called the "Debug" perspective. To open the debug perspective, click the "Open Perspective" toolbar button at the upper right corner of Eclipse.
A dialog box with a list of available perspectives will open; select  from the list. When the Debug perspective opens, it
should resemble this:
from the list. When the Debug perspective opens, it
should resemble this:
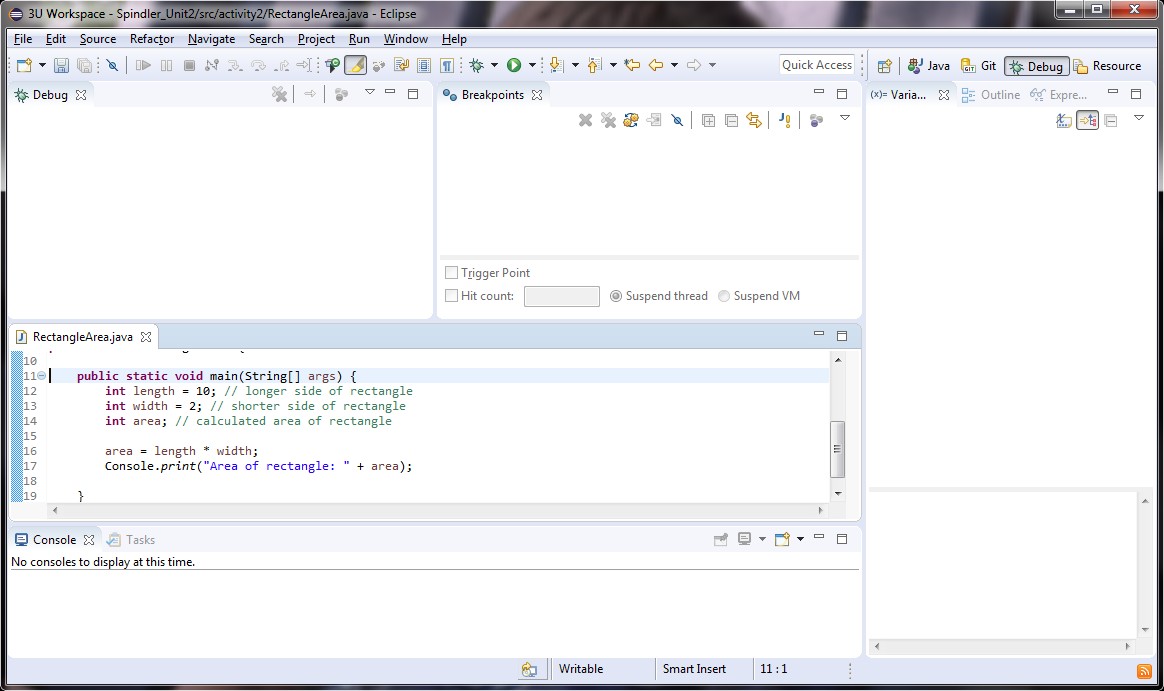
Notice that the screen is now divided into five different sections. The most important one is the "Variables" window in the upper right corner. This will allow you to view the contents of all the variables in your program, as it is running. The Variables are listed in the order that they are declared, and become highlighted when their values change.
Since computers run so quickly, we need to slow down the program execution to allow us to view the contents of our variables, and to observe the flow of our code. One way to accomplish this is by using a breakpoint, which signals to the interpreter that code execution should stop at this point, and give the programmer the option of 'stepping' through the code, one line at a time. Stepping though code and watching the values of variables can be an effective way to determine logic errors
To place a breakpoint in a program, find an executable line of code (not a comment or a whitespace line) and select Run -> Toggle Breakpoint (or type Ctrl+Shift+B). A blue circle should appear to the left of that line of code.
Instead of clicking the run button, click the debug button just beside it:  . When your program reaches the line with
the breakpoint, the program will pause. You will be able to view the contents of your variables, and then either resume your code (run it again, until it reaches another
breakpoint) or step through one line at a time.
. When your program reaches the line with
the breakpoint, the program will pause. You will be able to view the contents of your variables, and then either resume your code (run it again, until it reaches another
breakpoint) or step through one line at a time.
Here is a screenshot of a program in the middle of execution:

The execution control toolbar buttons  can be used to control the running of your program, one line at a time. Below is a quick
description of the important buttons:
can be used to control the running of your program, one line at a time. Below is a quick
description of the important buttons:
 Resume: Runs the program normally, until the next breakpoint is reached
 Suspend: Pauses a currently running program, so you can inspect the value of variables or step though code
 Terminate: Ends the currently running program.
 Step Into: Executes the current line. If the highlighted statement is a method call, this will 'step into'
the method. This may cause your editor to open a new file, or to skip to another location in the same file. You should only need to use this to step into a method that
you created.
Step Into: Executes the current line. If the highlighted statement is a method call, this will 'step into'
the method. This may cause your editor to open a new file, or to skip to another location in the same file. You should only need to use this to step into a method that
you created. Step Over: Executes the current line. If the highlighted statement is a method call, this will 'step over'
the method, but still execute the method normally. This is the stepping tool you will likely use the most!
Step Over: Executes the current line. If the highlighted statement is a method call, this will 'step over'
the method, but still execute the method normally. This is the stepping tool you will likely use the most! Step Return: Executes all the lines until the end of the current method is reached. This can be used to step
'out of' a method that was 'stepped into.'
Step Return: Executes all the lines until the end of the current method is reached. This can be used to step
'out of' a method that was 'stepped into.' Run To Line: Executes the program to the currently selected line in the editor. This button may not be on the
toolbar by default; but it is very useful and you can add it by customizing your debug perspective.
Run To Line: Executes the program to the currently selected line in the editor. This button may not be on the
toolbar by default; but it is very useful and you can add it by customizing your debug perspective.
Evidence of Learning
 Programming Exercises
Once you have read the material above complete the following activities. Place all your classes in the activity4 package (If a question asks you to modify a program, you must create a NEW copy of the class inside the activity4 package; do not change the code for the original program!)
- Modify the CircleCircumference application from activity 2 to prompt the user for the radius. If a negative number is entered by the user for the radius value, the program should display the message “Negative radii are illegal”. Otherwise, the application should calculate and display the circumference of the circle.
- Create a SurfsUp application that prompts the user for the wave height and then displays “Great day for surfing” when the waves are 6 feet or over, “Go body boarding!” when the waves are between 3 and 6 feet, and “Go for a swim.” when the waves are 3 feet or less. If the user enters a negative number, your program will display “Whoa! What kind of surf is that?”
- The Saffir-Simpson Hurricane Scale provides a rating (a category) depending on the current intensity of a hurricane. Create a Hurricane application that displays the wind speed, in km/h, for the hurricane category entered by the user. Refer to this website for the hurricane levels. Use a switch statement to create this application.
- In mathematics, the quantity b2-4ac is called the “discriminant”. Create a Discriminant application that prompts the user for the values of a, b, and c and then displays “No roots” if the discriminant is negative, “One root” if the discriminant is zero, and “Two roots” if the discriminant is positive. Application output should look similar to:
      Enter the value for a: 7
      Enter the value for b: -9
      Enter the value for c: 2
      Two roots